Wednesday, October 12, 2011

Week 6 - Pencil shading techniques

Homework:
1. Scan all your drawings that you've done from this class in this semester. Next week, we are going to learn how to make portfolio in Adobe Photoshop. So you are supposed to get ready by saving your drawings in JPEG or JPG files in your flash drive and bringing them to class. The architecture library on 9th floor in architecture building has very good scanners. We will use your scanned files on Monday class.

2. Draw one of your winter shoes. Please see the example of the glove drawing below. When your draw your shoe, you are supposed to get as much detail as possible like the glove drawing. Shapen your pencils first and always keep your pencils sharp. When you shade, don't blend with your finger or any tool. Just show the natural lines and shading strokes. Do this on 14x17 sketchbook. The drawing should be about the same size as your shoe.
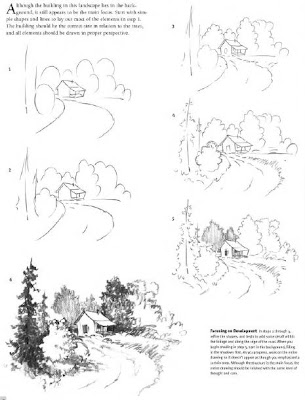
2. Copy Sketches.
Choose one of the two examples below to copy. Do them use pencils on 14x17 sketchbook.


3. Graphic Journal.

Do one of the graphic journals by using "cross contour" to your hand holding a drink (anykind is fine). Please see the example below. Use pencils. Don't forget to write text and date on your journals.


Thursday, September 29, 2011

Week 4 - Field Sketches

These week we only have this one mission - do field sketches.

Please draw 6 sketches:
2 for buildings on campus
1 for one sculpture on campus
1 for a small portion of a plant (micro study)
1 for coffeeshop drawing
1 for your transportation tool (car, bike or skateboard, etc.)

Pencils only, draw on 14x17 sketchpad. Staple all six drawings together when you turn in.

Sunday, September 18, 2011

Week 3 - Light, Shadow and Texture

Homework:
Please choose six types of surfaces that you could see on campus to do micro-drawing practice. Micro drawing, namely, is to focus on small area, observe carefully and do drawings. You could draw wood, fabric, soil, rock, brick wall, concrete, the surface of your dorm door, trash can, tree trunk surface, etc. Try avoid using contour lines, but rather form shape with light, shadow/shade and texture. The most important thing is OBSERVE and draw, not imagine and draw.

Do this on your 14x17 sketchbook paper. All six drawings on one paper, and follow the template is shown as below. All types of pencil as necessary. Write the surface name on top of each box.

Copy sketches.

Both on 9x12" sketchbook. Pencil only. Follow the steps to produce the final drawing.


Graphic Journal

Please do one of the graphic journal to draw your favorite shoe (draw one is fine) or your school bag. Pay attention to the shade, shadow and texture. Draw it as closest as you could to the real stuff.

Tuesday, September 13, 2011

Week 3 - Perspective 2 (Applications of perspective and modified perspective)

Homework:
Group project-modified perspective

When you do the project, please
1) understand the concept of "modified perspective" (i.e. draw 2d image in 3d spatial environment) first and discuss with your group members;
2) choose a viewpoint that is easy for everybody to look your piece;
3) Do not draw directly to the surface of our public environment. Any damage or polution to the environment is on your own responsibility. Please consider draw on paper first and then stick the drawing paper on the building stucture surface, if you have to use our building structure.
4) just do in our architecture college building.


Three photos:

1) the finished project taken from the viewpoint,

2) the finished project taken not from the viewpoint, and

3) group working picture when the project is in process.


When each group present your project, you are supposed to answer the following questions:

1) How did you come up with this idea?

2) Why did you pick this image to draw?

3) Why did you choose this space to draw (or on these surfaces)?

4) How much time did you spend in the project?

5) Who did what?

6) What did you learn from the project about perspective?

7) Any other gainings from the project?


Copy sketches:


Both on the 9x12" sketchbook. Please use pen.

1.

2.

Journals:

Please do one of the two journals using one or two point perspective to draw an indoor space (for example, your dorm, hallway, cafeteria, store, or ...).


Date, writing, and borders are required for each journal!

Tuesday, September 6, 2011

Week 2 - Perspective


First of all, before you start any drawing, leave at least 1/2 inch wide border on four sides of your paper.

Homework:
In class, we have practised one-point perspective drawings. Now, you have to do a little bit research on two-point perspective: concepts and some of the techniques to draw two-point perspective. Here is your task: do two drawings about ONE thing from your drawing tool kit, one drawing using one-point perspective and the other drawing using two-point perspective. Draw details the more closer to reality the better.

Do it on one piece of grid paper. Each drawing use half of a paper. Use pencil (but not limited to just one kind of pencie) just draw the outlines, no shading and shadowing needed for now.


Copy sketches:

Two for this week. Both on 9x12" sketchbook. Use pens, and black marker, if necessary. But you can use pencil first to draft, and then cover pencil lines with pens.

It is important that you should pay attention to the thickness and darkness (Line Weights) of the lines in these example sketches. Copy the exact line weight styles from the example sketches using different pens that have various thickness (the thickness is marked on the lid of a pen, e.g. .005, .01, .02, .03, .05, .08).

The second sketch is going to take a lot of time, so please don't wait till the last minute to do it.


Graphic Journal:


Please do one of the journals to draw your computer mouse, plus 1) using one-point perspective; 2) use continuous line. (Hint: draw a one-point perspective box first, and then add details using continuous line.)


Date and text are required for both journals.